Powered by two processors and eight microphones, the WH-1000XM5 offers industry-leading noise cancellation that surpasses expectations. The Auto NC Optimizer intelligently adjusts noise-cancelling settings according to surroundings and wearing conditions, ensuring an optimal experience at all times.
Crafted for comfort and engineered for excellence, these headphones boast a specially designed 30mm driver unit that delivers superior sound quality across all genres. Whether you’re engulfed in the depths of your favourite playlist or engaging in crystal-clear conversations, the WH-1000XM5 sets a new benchmark for distraction-free listening and exceptional call clarity.

Experience the next level of audio innovation with the WH-1000XM5 – where every note is pristine, and every call is crisp and clear.
How to Connect WH-1000XM5 headphones to an iPhone
Pairing your WH-1000XM5 Wireless Noise Cancelling Headphones with your iPhone is a straightforward process that allows you to enjoy your favourite music and audio content wirelessly. Whether setting up your headphones for the first time or connecting them to a subsequent device, follow these simple steps to ensure a seamless connection.
Before you start the pairing process, ensure the following.
- Proximity: Place your iPhone within 1 meter (3 feet) of the WH-1000XM5 headphones.
- Charge: Ensure that your headphones are adequately charged.
- Operating Instructions: Have the operating instructions for your iPhone readily available.
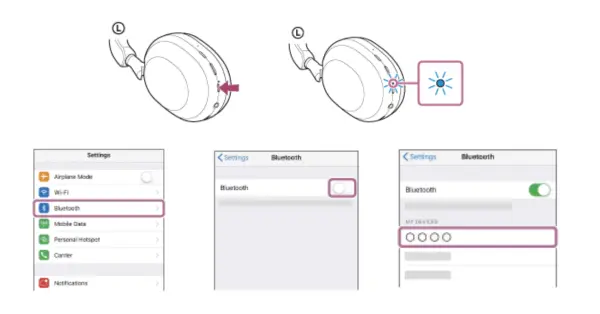
Pairing Mode
Suppose you pair your headphones with a device for the first time or after initialisation. In that case, the headset will automatically enter pairing mode when turned on. However, suppose you’re pairing with a second or subsequent device. In that case, you’ll need to manually enter pairing mode by following these steps:
- Press and hold the power button on the headphones for about 5 seconds until the indicator light (blue) flashes twice in a row. You hear the voice guidance say, “Pairing”.
iPhone Setup:
- Unlock Your iPhone: If your iPhone is locked, unlock the screen.
- Access Bluetooth Settings:
- Open the Settings app on your iPhone.
- Tap on “Bluetooth”.
- Enable Bluetooth: Toggle the switch to turn on the Bluetooth function if it’s not already activated.
- Pair with WH-1000XM5:
- Under the list of available devices, locate and select “[WH-1000XM5]”.
- If prompted to input a Passkey (*), enter “0000”.
- Connection Confirmation:
- Once paired successfully, you’ll hear a notification sound confirming the establishment of the connection between the headphones and your iPhone.
Troubleshooting
If the headphones and iPhone fail to connect, refer to the “Connecting to a paired iPhone” section in the operating instructions. If “[WH-1000XM5]” does not appear on your iPhone’s display, repeat the steps from accessing Bluetooth settings.
Additional Notes:
- Passkey may also be referred to as “Passcode”, “PIN code”, “PIN number”, or “Password”.
- For further details or troubleshooting, consult the operating instructions on your iPhone.
- If pairing is not established within 5 minutes, pairing mode will be cancelled. If this happens, turn off the headphones’ power and restart the pairing process from step 1.
- Remember, once Bluetooth devices are paired, there’s typically no need to pair them again unless specific circumstances require it, as outlined in the provided notes.
Following these steps, you can effortlessly pair your WH-1000XM5 Wireless Noise Cancelling Headphones with your iPhone and enjoy a high-quality audio experience anytime, anywhere.
How to Connect WH-1000XM5 headphone to an Android phone
To connect your WH-1000XM5 Wireless Noise Cancelling Headphones to an Android phone, follow these steps
Prepare for Pairing
- Ensure your Android smartphone is within 1 meter (3 feet) of the headset.
- Make sure the headset is adequately charged.
- Have the operating instructions for your Android smartphone ready.
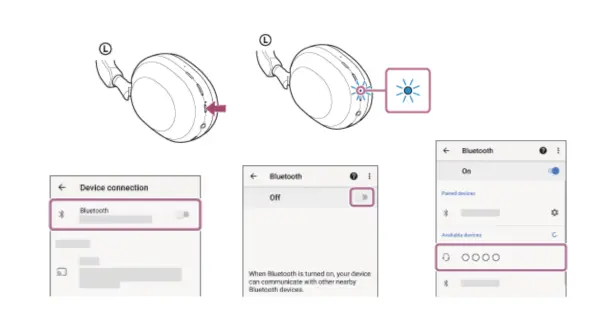
Enter Pairing Mode
- If pairing for the first time or after initialisation:
- Turn on the headset. It will enter pairing mode automatically.
- If pairing with a second or subsequent device:
- Press and hold the (power) button for about 5 seconds until the indicator (blue) flashes twice in a row, and you hear the voice guidance say, “Pairing”.
Prepare Smartphone:
- Unlock the screen of your Android smartphone if it is locked.
Access Bluetooth Settings
- Go to your Android smartphone’s settings.
- Navigate to [Settings] – [Device connection] – [Bluetooth].
Turn on Bluetooth
- Touch the switch to turn on the Bluetooth function if it’s not enabled.
Pair with WH-1000XM5
- Look for [WH-1000XM5] in the list of available devices.
- Touch [WH-1000XM5] to initiate pairing.
- If prompted for a Passkey (*), input “0000”.
Confirmation of Connection
- Once paired, you will hear a notification confirming the established connection.
Troubleshooting
- If the headset and smartphone are disconnected, refer to the “Connecting to a paired Android smartphone” section.
- If [WH-1000XM5] does not appear on the Android smartphone screen, repeat the process starting from step 3.
Note
- Passkey may also be referred to as “Passcode”, “PIN code”, “PIN number”, or “Password”.
- For more detailed instructions or troubleshooting, consult the operating instructions provided with your Android smartphone.
- If pairing is not established within 5 minutes, pairing mode will be cancelled. In such cases, restart the process from step 1.
- There’s no need to pair Bluetooth devices again unless pairing information is deleted, a 9th device is paired, or the headset is initialised.
- While the headset can be paired with multiple devices, it can only play music from one paired device at a time.
How to Connect WH-1000XM5 Wireless Noise Cancelling Headphones to a Windows 10 Computer
Pairing your WH-1000XM5 Wireless Noise Cancelling Headphones with your Windows 10 computer allows you to enjoy high-quality audio wirelessly while working, gaming, or watching videos. Here’s a step-by-step guide to help you effortlessly connect your headphones to your computer.
Before starting the pairing process, ensure the following:
- Bluetooth Functionality: If you intend to use your computer for video calling, ensure it has a Bluetooth function that supports music playback connections (A2DP) and calling connections (HFP/HSP).
- Proximity: Place your computer within 1 meter (3 feet) of the headphones.
- Charge: Ensure that your headphones are adequately charged.
- Operating Instructions: Have the operating instructions for your computer readily available.
Pairing Mode
Suppose you pair your headphones with a device for the first time or after initialisation. In that case, the headset will automatically enter pairing mode when turned on. However, suppose you’re pairing with a second or subsequent device. In that case, you must manually enter pairing mode by following these steps.
- Press and hold the power button on the headphones for about 5 seconds until the indicator light (blue) flashes twice in a row. You hear the voice guidance say, “Pairing”.
Computer Setup
- Wake Up Your Computer: If it is in standby (sleep) or hibernation mode, wake it up.
- Swift Pair Function (Optional):
- If your Windows 10 version is 1803 or later, you can use the Swift Pair function to simplify the pairing process.
- Click the Start button, navigate to Settings > Devices > Bluetooth & other devices, and check “Show notifications to connect using Swift Pair” is checked.
Pair the Headset
- To connect using the Swift Pair function:
- Select “Connect” from the pop-up menu displayed on your computer screen.
- To connect without using the Swift Pair function:
- Click the Start button, then go to Settings.
- Click on “Devices”.
- Select the “Bluetooth & other devices” tab, toggle the Bluetooth switch to turn on the Bluetooth function, and then click “Add Bluetooth or other device”.
- Choose “Bluetooth”, then select “[WH-1000XM5]” from the list of available devices.
- If prompted to input a Passkey (*), enter “0000”.
- Connection Confirmation:
- Once paired successfully, you’ll hear a notification sound confirming the establishment of the connection between the headphones and your Windows 10 computer.
Troubleshooting
If the headphones and computer fail to connect, refer to the “Connecting to a paired computer (Windows 10)” section in the operating instructions. If “[WH-1000XM5]” does not appear on your computer’s screen, repeat the steps from selecting the Bluetooth device.
Additional Notes
- Passkey may also be referred to as “Passcode”, “PIN code”, “PIN number”, or “Password”.
- For further details or troubleshooting, consult the operating instructions on your computer.
- If pairing is not established within 5 minutes, pairing mode will be cancelled. If this happens, turn off the headphones’ power and restart the pairing process from step 1.
- Remember, once Bluetooth devices are paired, there’s typically no need to pair them again unless specific circumstances require it, as outlined in the provided notes.
Following these steps, you can easily connect your WH-1000XM5 Wireless Noise Cancelling Headphones to your Windows 10 computer and enjoy an immersive audio experience.


Pingback: How to Connect WH-1000XM5 headphones - Kowatek